Obsolescence Warning
This guide is obsolete. The up-to-date revision is embedded in the software.
Introduction
Overview
Phoyo is photo
booth automation software.
The complete list of its features is available here.
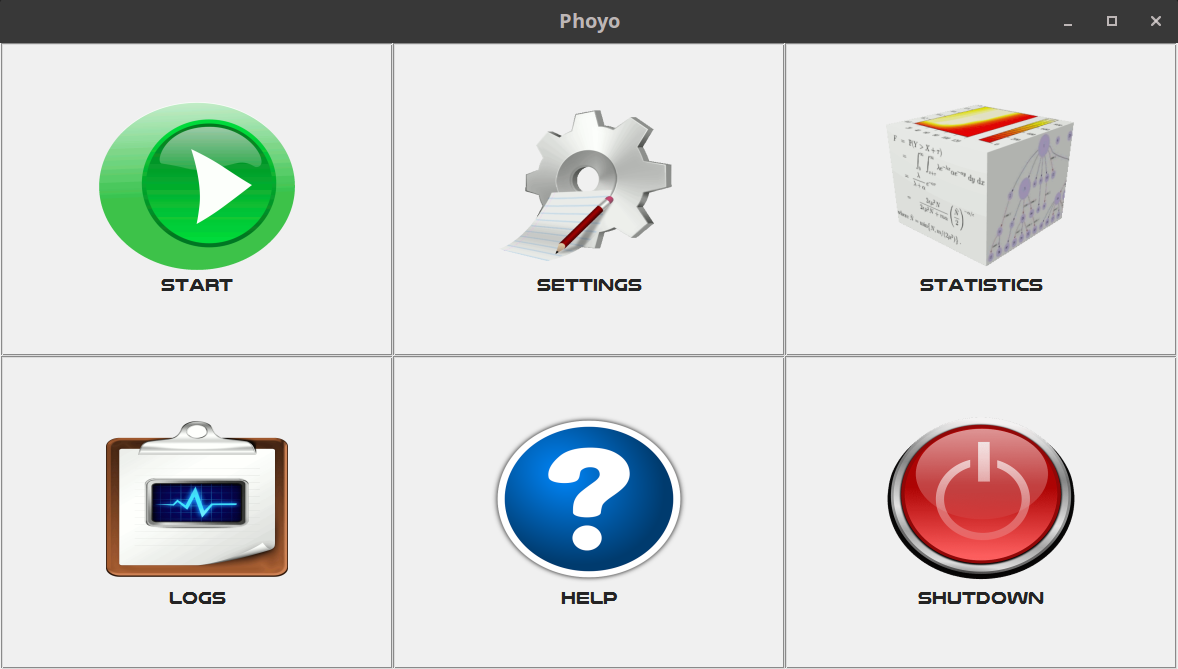
Main windows
The Control Window
This is the main window of Phoyo.
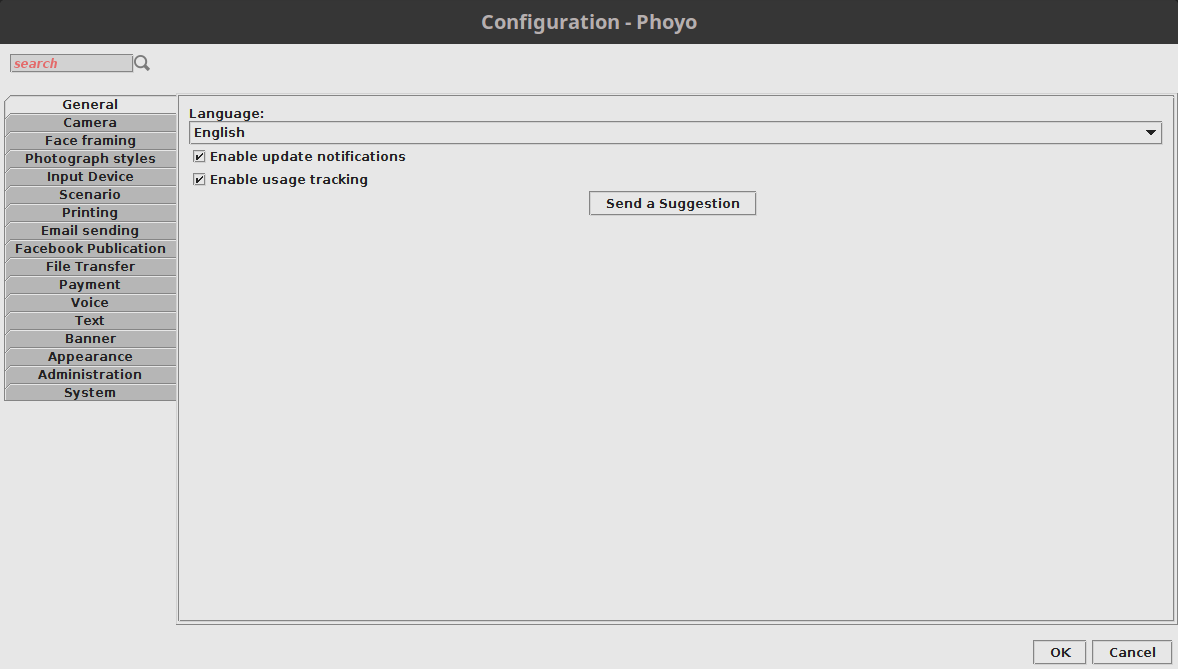
The Configuration Window
The settings of the photo booth devices and the user
experience are available in this window.
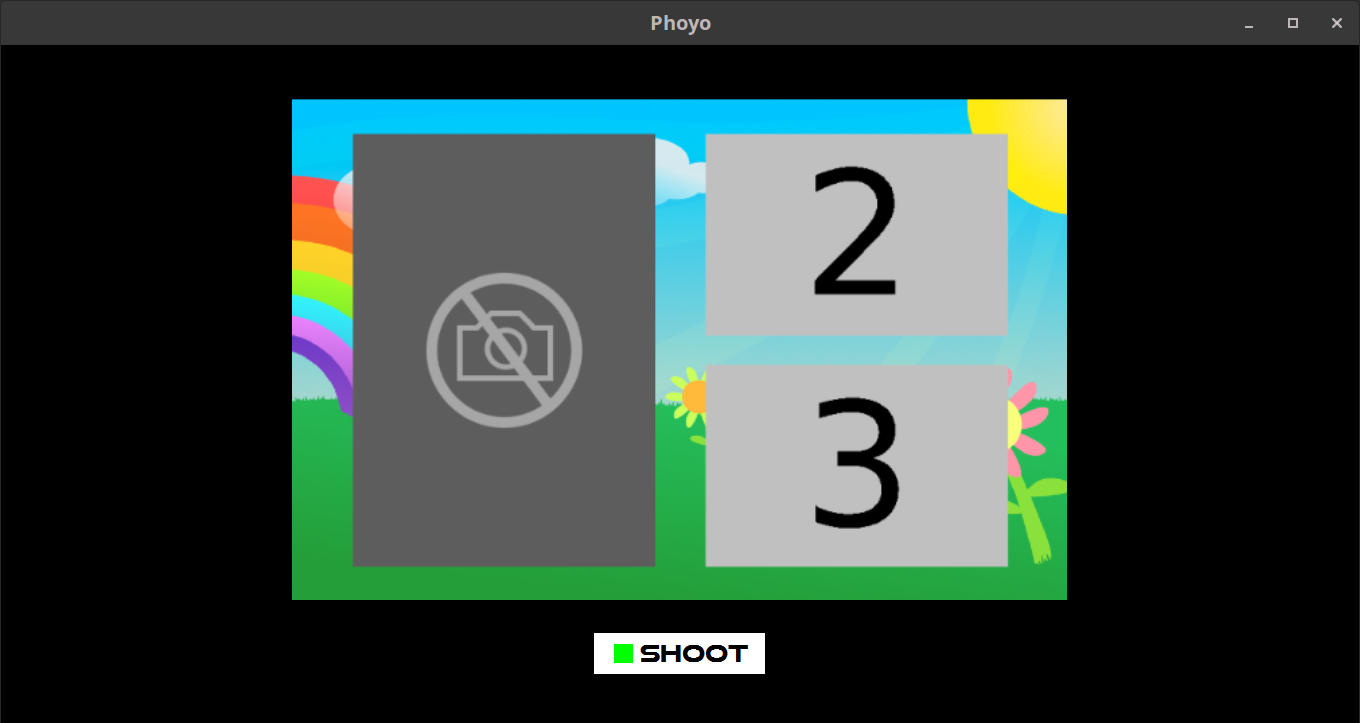
The Execution window
The photograph sessions are executed through this window.
Configuration Options
General
Language
Allows to select the current language.
Enable update modifications
If this option is enabled then the software will notify the user when new software updates are available.
Enable usage tracking
If this option is enabled then some Phoyo usage data will be sent to the software editor.
Camera
Performance tips
Do not use high video stream resolutions.
Use high resolutions for photographs only.
Select the device
Allows to select the active camera device.
Digital cameras support (DSLR, ...)
If this option is enabled then digital cameras (Canon,
Nikon, …) will be available for selection if connected to
the photo booth computer and supported.
According to the software edition, many compatibility
modes may be available. The option may be unavailable too.
The list of supported cameras is here.
Resolutions
Video resolution
Allows to select the resolution of the video stream.Photo resolution
Allows to enable/disable a custom resolution for the
photograph images.
Note that for webcams the default resolution of photograph
images is the same as the video
resolution.
If a value different from <auto> is selected then the specified resolution will be used for photographs only (not for the video stream). It may slow down slightly the shooting phase since the device resolution will be changed on the fly.
Brightness/Contrast
These options allow to perform basic color correction (lighting change) of the video frames.Video
Smooth the image
Allows to use some image processing algorithms that will make the video frames smoother and generally enhance their quality.
Correction filters
Allows to enhance/correct the input video stream by using Image Filters.
Photograph
Custom correction filters
Allows to enable/disable correction filters distinct
from the video correction
filters for photograph images.
If this option is enabled then the specified correction
filters will be used.
Auto-match with video format ratio
If this option is enabled then the raw photographs
resolution width/height ratio will be adjusted to match
the video resolution ratio. It prevents positioning
differences between a video preview and its final
photograph.
Smoothing level
Allows to use some image processing algorithms that will
make the photograph images smoother and generally enhance
their quality.
Face Framing
The face frame is the base for every face-based image processing in Phoyo.
It is used by the identity and the montage formats for
their image processings and user guidance.
Size
Allows to change the size of the face frame.
Vertical offset
Allows to change the vertical offset of the face frame.
Simple
Photo
This photograph style allows to get pictures without any constraint or decoration.
Enable simple photo
Allows to enable/disable this photograph style.
Image cropping
This option allows to change the cropping mode of the
output image.
The image can be cropped to isolate the face or to fill
the printable area.
The cropping can also be deactivated so that the image
will be scaled to fit in the printable area.
Output / Orientation
This option allows to choose the orientation of the image
on the papers.
Enable the directions screen
This option allows to enable/disable a screen that will be inserted just before the shooting screen. This screen displays a text and an image that will provide specific instructions for the users in order to get the best picture as possible.
Identity
Photograph
This photograph style allows to get pictures that conforms to the passport standards and then can be used for official documents.
Enable identity photograph
Allows to enable/disable this photograph style.
Live view mode
Allow to change the way the user can preview its final identity photograph print during a session.
Mosaïc
Allows to change the number of identity photograph copies
and their layout on the final print.
Output / Orientation
This option allows to choose the orientation of the image
on the paper.
Enable the directions screen
This option allows to enable/disable a screen that will be inserted just before the shooting screen. This screen displays a text and an image that will provide specific instructions for the users in order to get the best picture as possible.
Photo Collage
This photograph style allows to get pictures with the traditional photo booth multiple pictures layouts.
Enable photo collage
Allows to enable/disable this photograph style.
Layout
This option allows to choose the pictures layout on the
print.
Background
This option allows to choose an alternate background for the collage.
Live view mode
This option allows to select different type video live
preview for this photograph style.
Output / Orientation
This option allows to choose the orientation of the image
on the paper.
Enable the directions screen
This option allows to enable/disable a screen that will be inserted just before the shooting screen. This screen displays a text and an image that will provide specific instructions for the users in order to get the best picture as possible.
Photo Montage
This photograph style allows to get various customizable decorations (templates) on the final pictures.
Enable photo montage
Allows to enable/disable this photograph style.
Templates
This is the list of templates that will be available for
selection during a session.
You can create, edit and remove the entries.
Output / Orientation
This option allows to choose the orientation of the image
on the paper.
Enable the directions screen
This option allows to enable/disable a screen that will
be inserted just before the shooting screen. This screen
displays a text and an image that will provide specific
instructions for the users in order to get the best
picture as possible.
Decor
This photograph style allows to get pictures with bodies seemingly transposed in a background scene.
Enable decor
Allows to enable/disable this photograph style.
Templates
This is the list of templates that will be available for
selection during a session.
You can create, edit and remove the entries.
Image cropping
This option allows to change the cropping mode of the
output image.
The image can be cropped to isolate the face or to fill
the printable area.
The cropping can also be deactivated so that the image
will be scaled to fit in the printable area.
Output / Orientation
This option allows to choose the orientation of the image
on the paper.
Background detection mode
The boundaries of the bodies need to be detected and
isolate in realtime. This option allows to choose between
2 modes:
Automatic detection mode
The actual background will be learned by the software and
the acquired knowledge will be used to detect
automatically the boundaries of the bodies.
This mode offers options
- to improve the background/foreground detection quality
(rendering improvements)
- to tweak the background learning
- to enable/disable the automatic background knowledge
update when the field of view is altered because of a
camera move or a lighting change, etc.
Chroma key (green screen) detection mode
In this mode the actual background is supposed to have a
uniform color that will be detected by the software as
part of the replaceable image part.
Enable the directions screen
This option allows to enable/disable a screen that will
be inserted just before the shooting screen. This screen
displays a text and an image that will provide specific
instructions for the users in order to get the best
picture as possible.
Video Loop
This photograph style allows to get animated pictures in the GIF format.
Enable video loop
Allows to enable/disable this photograph style.
Image cropping
This option allows to change the cropping mode of the
output image.
The image can be cropped to isolate the face or to fill
the printable area.
The cropping can also be deactivated so that the image
will be scaled to fit in the printable area.
Output / Orientation
This option allows to choose the orientation of the image
on the papers.
Recording duration
This option allows to specify the recorded video length
in milliseconds.
Replay speed factor
This option allows to change the speed of the animation.
The default speed value will be multiplied by this setting
value.
Enable the directions screen
This option allows to enable/disable a screen that will be inserted just before the shooting screen. This screen displays a text and an image that will provide specific instructions for the users in order to get the best picture as possible.
Input
Device
Input channel
Here you can choose the device that will allow users to
interact with the photo booth software during a session.
Mouse buttons
This option allows to interact with the software by using
the click signals of the mouse buttons.
Note that this feature does not allow to use the mouse
pointer. It is intended for to allow the connection of a
physical push button through a mouse device driver.
Keyboard
This option allows to interact with the software by using
the signals of the keyboard keys.
Note that this feature does not allow to use the mouse
pointer. It is intended for to allow the connection of a
physical push button through a keyboard device
driver.
Touch screen/mouse cursor
This option allows to interact with the software by using
the mouse pointer or a touch screen device.
This is the default input feature.
Scenario
Some aspects of the execution flow can be controlled from
this tab.
Enable the idle screen
Allows to add/remove the idle screen that will be
displayed after a period of inactivity.
Always start a session from the idle screen
If this option is enabled then any session will forcibly be started from the idle screen (if the idle screen is enabled).
Inactivity delay before cancelling a session
If a user begins a session and quit before the end of this session, then after a while, the software will automatically cancel the session.
The current option allows to specify the number of
seconds to wait before cancelling the session.
Shot countdown
Allows to configure the shooting countdown duration.
Maximum number of attempts
Allows to configure the number of times a shooting can
be cancelled and retried.
Enable the print preview screen
Allows to enable/disable the flash print preview screen
that is displayed just after the shooting.
Effects
Effects are complex filter combinations that are usually
too CPU greedy to be executed in real time. They are then
selected and applied on a specific screen after the
shooting.
Enable post-processing effects
Allows to enable/edit/disable the effects (sepia,
cartoon, ...) selection screen options.
Paper
Size
Allows to specify the paper size.
Margins
Allows to specify the printing margins on the paper.
Printing
Enable printing
Allows to enable/disable printing.
Printer
Allow to select the printing device.
DPI
"Dots per inch" setting (may enhance the quality).
Wait for printing job end
This option allows to synchronously wait for the printing
job to end (option enabled) or launch the printing job
asynchronously (option disabled, will be faster).
Anti-aliasing
When enabled, this option may enhance the print quality
but also cause a slight blur effect depending on the
output device.
Printing filters
Image Filters that will be applied to the pictures just before sending them to the printing device.
Email
This feature allows the users to send their pictures by e mail.
Allow to send the photographs by email
Allows to enable/disable email sending.
Message
Allows to specify the details of the message to which the pictures will be attached and sent.
SMTP server
Allows to specify the details of the SMTP outgoing server.
Facebook
This feature allows the users to post their pictures on their facebook account.
Allow to publish to facebook
Allows to enable/disable facebook posting.
Facebook login page zoom
Allows to resize the facebook login page.
Note that the facebook page will display a blocking notice if its area on the screen is not big enough.
You can then use this option to virtually allocate additional area to the facebook login page.
File Transfer
This feature allows to drop the final pictures on the local disk and eventually perform automatically arbitrary tasks.
Allow to drop the photographs in a directory
Allows to enable/disable file transfers.
Target Directory
Allows to specify the directory in which the pictures will be dropped.
File processing command
Specifies a system command to be executed right after the file transfer.
The <FILE> marker will be replace d by the file path.
Example: start <FILE>
Payment
This feature allows to require payments from the users in order to complete a photograph session.
This feature is intended to be used with a coin acceptor.
Enable the payment
Allows to enable/disable the payment.
Driver
The following options are supported for coin acceptor connection to Phoyo.
Keyboard bridge
With this driver, each type of coin inserted in the coin acceptor will send a dedicated key code (also called channel) to the software.
Currently Phoyo handles 6 channels which means 6 different types of coin.
You will find more information about how to use any coin selector with this driver here.
Key associated with the channel n°x
Allows to specify the keys that will activate each channel.
Wafer EU1 coin selector
This driver only works with the following coin selector: EU1-Coin-Acceptor
WARNING: the RS232 adapter is necessary: EU1-Coin-Acceptor-PC_Connector
Serial port
Allows to select the serial port to which the coin acceptor is connected.
Amount associated with the channel n°x
Allows to specify the amount of money associated with each channel.
Currency
Allows to specify the currency of the money.
Prices
Allows to specify the price of each product.
Payment Chronology
Allows to specify when the money should be collected (before or after the shooting).
Voice
Enable
Allows to enable/disable the vocal messages.
Maximum number of vocal repetitions before cancelling a session
This option is similar the option "Inactivity delay before cancelling a session".
Except that it will be used, only in case vocal assistance is active, to count the number of vocal message repetitions before cancelling the session.
Change the audio
Allows to change a specific vocal message.
Text
Default messages
The default messages that are displayed during a session.
Alternative messages
The alternative (modifiable) messages that will be displayed during a session.
Banner
This feature allows to brand the final pictures with a custom image.
Insert a banner in the pictures
Allows to enable/disable the banner.
Change the banner
Allows to change the banner image.
Positioning
Allows to change the position of the banner image on the final picture.
Appearance
Full screen
Allows to display full-screen sessions.
Hide the mouse cursor
Allows to hide the mouse cursor during sessions.
Display the message: Press <ESCAPE> to exit
Allows to hide the message “Press <ESCAPE> to exit” during sessions.
Images
Allows to change various images displayed during the sessions.
Screens
Margins
Allows to change the margins of session screens.
F or example, b y reducing them you can force the screen elements to scatter and then give more space to the video and photo frames.
Transition effect
Allows to specify how to display transitions between session screens.
Fading transition speed
Allows to specify the speed of the fading transition effect.
Font Sizes
Allows to change the font size of different text elements in session screens.
Font colors
Allows to change the font color of different text elements in session screens.
Administration
Unlock password
Allows to lock down the screen during a session. A password is then required when the ESCAPE key is pressed in order to quit the session.
Online administration
This feature allows execute several administration tasks without the need to quit the execution window.
It is particularly useful for closed booths on which the software backend access is difficult.
Enable
Allows to enable/disable the online administration.
Access code
Allows to specify a code that will be required to access online administration.
Custom online administration tools
Allows to specify custom additional tools that will be available from the online administration.
System
Begin a session on the program startup
Allows to enable/disable systematic session execution on the software startup.
Standby when idle
Enable
Allows to enable/disable standby command execution when idle.
Standby when inactive for
Allows to specify the inactivity duration that triggers the standby command execution.
System standby command
Allows to specify the standby command.
Start a session on wakeup
Allows to enable/disable systematic session startup when the standby mode exits.
Verbose logs
Allows to enable/disable detailed logs.
Execution
Start
To start the execution you must click on the “Start” button of The Control Window.
Sessions
When the execution starts, the devices are initialized and if the initialization succeeds then the idle screen is displayed.
You can then either press “Start” to launch a photograph session or “Administration” to launch an administration session.
Stop
To stop the execution you must close The Execution window.
Note that in full-screen mode, you will not have access to the execution window title bar. You can then press the escape button to close the window.
Image Filters
Phoyo uses filters to achieve a variety of effects on images.
There are 2 kinds of filters:
Basic filters
A basic filter takes an input image, applies a mathematical algorithm to it, and returns a modified image.
Ex: blur, brightness and contrast, color temperature, overlay image, etc.
Composition filters
A composition filter does not directly modify an image. It only changes the way the following filters will modify the image.
Ex: chroma key, discriminate region, select channel, etc.
Note that every composition filter name is prefixed by
“(composition)”
Chroma Key
(Green Screen)
More information about this feature can be found here.
Learn more
To learn more about filters explore the templates in the
configuration window
and see how they are made.
Procedures
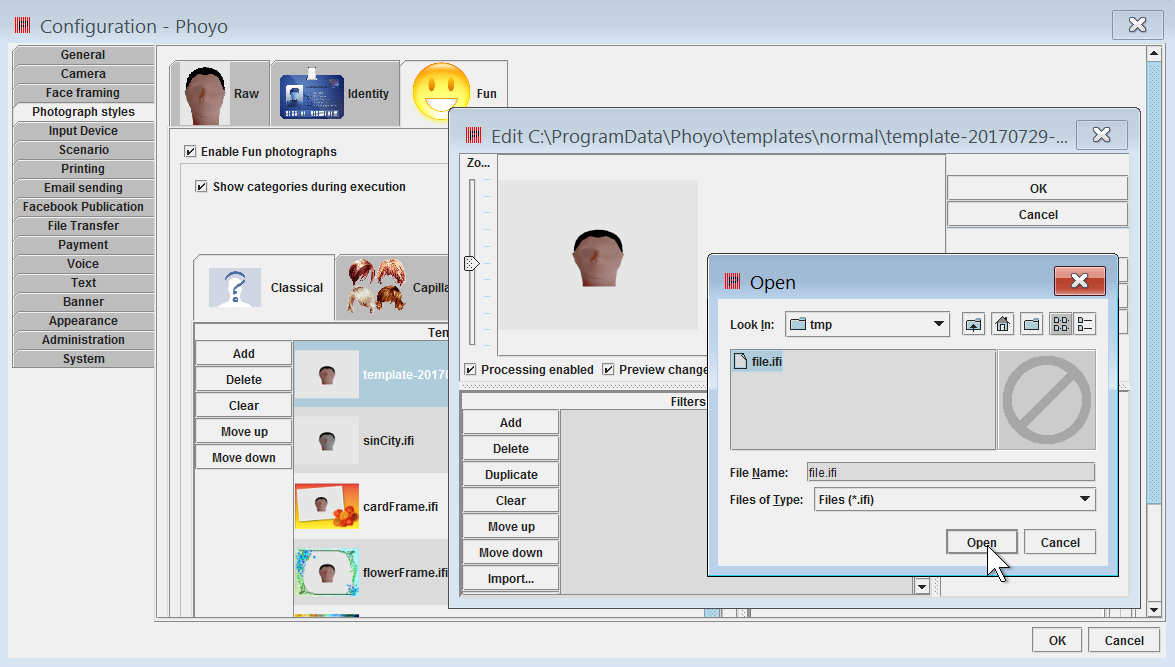
How to
import a template
- Download the template file (*.ifi)
- Open the configuration window
- Navigate to “Photograph Styles / Fun / Classical” tab
- Click on “Add” to create a new template
- Select the template and click on the “Edit” button to open the template editor
- Click on “Import”
- Select the above downloaded template file
- Click on “Open” to load it
- Click on “OK” to save the configuration